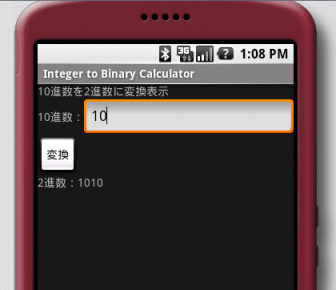
試しに下図のような簡素な10進2進変換アプリを作ってみました。

以下は書いてみたコード。
ソースコード
res/values/strings.xml
<?xml version="1.0" encoding="utf-8"?>
<resources>
    <string name="app_name">Integer to Binary Calculator</string>
    <string name="label_description">10進数を2進数に変換表示</string>
    <string name="label_integer">10進数:</string>
    <string name="label_binary">2進数:</string>
    <string name="button_convert">変換</string>
</resources>
res/layout/main.xml
<?xml version="1.0" encoding="utf-8"?>
<linearLayout xmlns:android="http://schemas.android.com/apk/res/android"
    android:orientation="vertical"
    android:layout_width="fill_parent"
    android:layout_height="fill_parent"
    >
<textView
    android:layout_width="fill_parent"
    android:layout_height="wrap_content"
    android:text="@string/label_description"
    />
<linearLayout
    android:orientation="horizontal"
    android:layout_width="fill_parent"
    android:layout_height="wrap_content"
    >
<textView
    android:layout_width="wrap_content"
    android:layout_height="wrap_content"
    android:text="@string/label_integer"
    />
<editText android:id="@+id/text_integer"
    android:layout_width="fill_parent"
    android:layout_height="wrap_content"
    android:numeric="integer"
    android:maxLength="9"
    android:text=""
    />
</linearLayout>
<button android:id="@+id/button_convert"
	android:layout_width="wrap_content"
	android:layout_height="wrap_content"
	android:text="@string/button_convert"
	/>
<textView android:id="@+id/label_result"
    android:layout_width="fill_parent"
    android:layout_height="wrap_content"
    android:text=""
    />
</linearLayout>
ITBCalculatorActivity.java
package info.yukun.android.itbcalc;
import android.app.Activity;
import android.os.Bundle;
import android.view.View;
import android.widget.Button;
import android.widget.EditText;
import android.widget.TextView;
public class ITBCalculatorActivity extends Activity {
  /** Called when the activity is first created. */
  @Override
  public void onCreate(Bundle savedInstanceState) { // アクティビティが生成される際に必ず呼び出される
    super.onCreate(savedInstanceState);
    setContentView(R.layout.main); // UIのレイアウトを設定
    // 指定したリソース(R.java)インデックスからビュー(res/layout/main.xml)内のidのコンポーネント(ここではButton)インスタンスを取得
    Button button = (Button) findViewById(R.id.button_convert);
    button.setOnClickListener(convertToBinary); // ボタンが押された際のイベントを登録
  }
  // 登録するイベントリスナーはView.OnClickListenerを実装
  private View.OnClickListener convertToBinary = new View.OnClickListener() {
    public void onClick(View view) { // ボタンが押されたときに呼び出されるメソッド
      EditText textInteger = (EditText) findViewById(R.id.text_integer); // 入力値が入っているコンポーネントを取得
      String input = textInteger.getText().toString();
      if (input.equals("")) return;
      int intValue = Integer.parseInt(input);
      String binValue = Integer.toBinaryString(intValue); // 10進数整数を2進数文字列に変換
      TextView labelResult = (TextView) findViewById(R.id.label_result); // 結果を表示するTextViewを取得
      labelResult.setText("2進数:" + binValue);
    }
  };
}
Androidアプリを書いてみて
EditText android:id=”@+id/text_integer”の属性android:maxLengthを”9″としたのは、変換メソッドInteger.toBinaryString(int value)の引数が32bit整数の為です。本当は属性値を10としてonClickメソッド内で32bitの範囲内(-2 147 483 647 ~ 2 147 483 647 = (2^31) – 1)か否かを判定したほうが良いと思うのですが、今回は端折りました。
ビジュアルエディタやXMLでUIのレイアウトを作っていくというのはFlexのmxmlに似てて取っ掛かり易い感じです。